Getting Started with Jet API
Read the Jet API Documentation
Authentication
The Signiant Jet API requires a client_id and client_secret to generate an OAuth token that allows access to a Jet account. To get a set of credentials, contact Signiant Customer Care.
The Jet API allows access with one of two user roles:
S2S_ADMINuser roles provide full read and write access to the APIJET_VIEW_ONLYuser roles provide read access to thejobsendpoint.
To generate an OAuth token:
Ensure your computer can connect to all
cloud.signiant.comdomains by allowing firewall access to*.cloud.signiant.com.Create a new JSON file specifying your Jet login credentials,
client_id,client_secret, andclient_credentialsas the grant type:{
"client_id": "<your client_id>",
"client_secret": "<your client_secret>",
"grant_type": "client_credentials"
}-
Save the file as
credentials.json. In your terminal or command prompt, navigate to the directory where
credentials.jsonis stored.Use the
curlutility to call the/oauth/tokenendpoint:> curl -X POST -H "Content-Type: application/json" --data @credentials.json https://platform-api-service.services.cloud.signiant.com/oauth/token
After completing the request, the server returns an OAuth token that is used to authorize your API requests:
{
  "access_token": "<access_token>",
  "expires_in": 3600,
  "token_type": "Bearer"
}Note: OAuth tokens expire one hour after they are created.
Creating a Storage Profile
Before you can create a job using the API, you must configure a source and destination storage profile.
Note: You must create at least one endpoint in the Signiant Console before creating a storage profile.
To create a storage profile:
- Send a
GETrequest to/v1/endpointsto retrieve a list of your endpoints.
> curl -X GET -H "Authorization: Bearer <token>" -H "Content-Type: application/json" https://platform-api-service.services.cloud.signiant.com/v1/endpoints-
Using the response body, determine the
endpointIdof the source and destination endpoints. -
Send a
POSTrequest to/v1/storageProfilesthat includes theendpointId, folderurl, andnameto create a new storage profile for the source and destination endpoints.
{
  "endpointId": "11111111-12345-abccd-12345",
  "url": "file:///path/to/folder",
  "name": "Example Profile"
}
The response body includes a storageProfileId which is required to set a source and destination when creating a job.
Creating a Job
Before creating a job you must have a source and destination storage profile created and their coordinating storageProfileId, which is generated when creating a storage profile. To retrieve a pre-existing storageProfileId, send a request to the storageProfiles endpoint.
To create a hot folder job:
-
Create a request body that includes a
storageProfileIdfor thesourceanddestinationwithin theactionsarraydataobject. -
Include the source
storageProfileIdas part of thetriggersarraydataobject. ThestorageProfileIdin thetriggersarray must match the sourcestorageProfileId.
{
  "name": "Example Transfer Job",
  "actions": [
    {
      "type": "TRANSFER",
      "data": {
        "source": {
          "storageProfileId": "11111111-12345-abccd-12345"
        },
        "destination": {
          "storageProfileId": "11111111-12345-abccd-54321"
        }
      },
      "triggers": [
        {
          "type": "HOT_FOLDER",
          "data": {
            "source": {
              "storageProfileId": "11111111-12345-abccd-12345"
            }
          }
        }
      ]
    }
  ]
}Note: To create a manual job, omit the triggers array.
- Send the request body to the
/v1/jobsendpoint to create the job.
The response body contains the complete job body, including the jobId, which can be used to pause, resume, or delete a job via the /jobs/{jobId} endpoint.
For more information read the Jet API documentation.
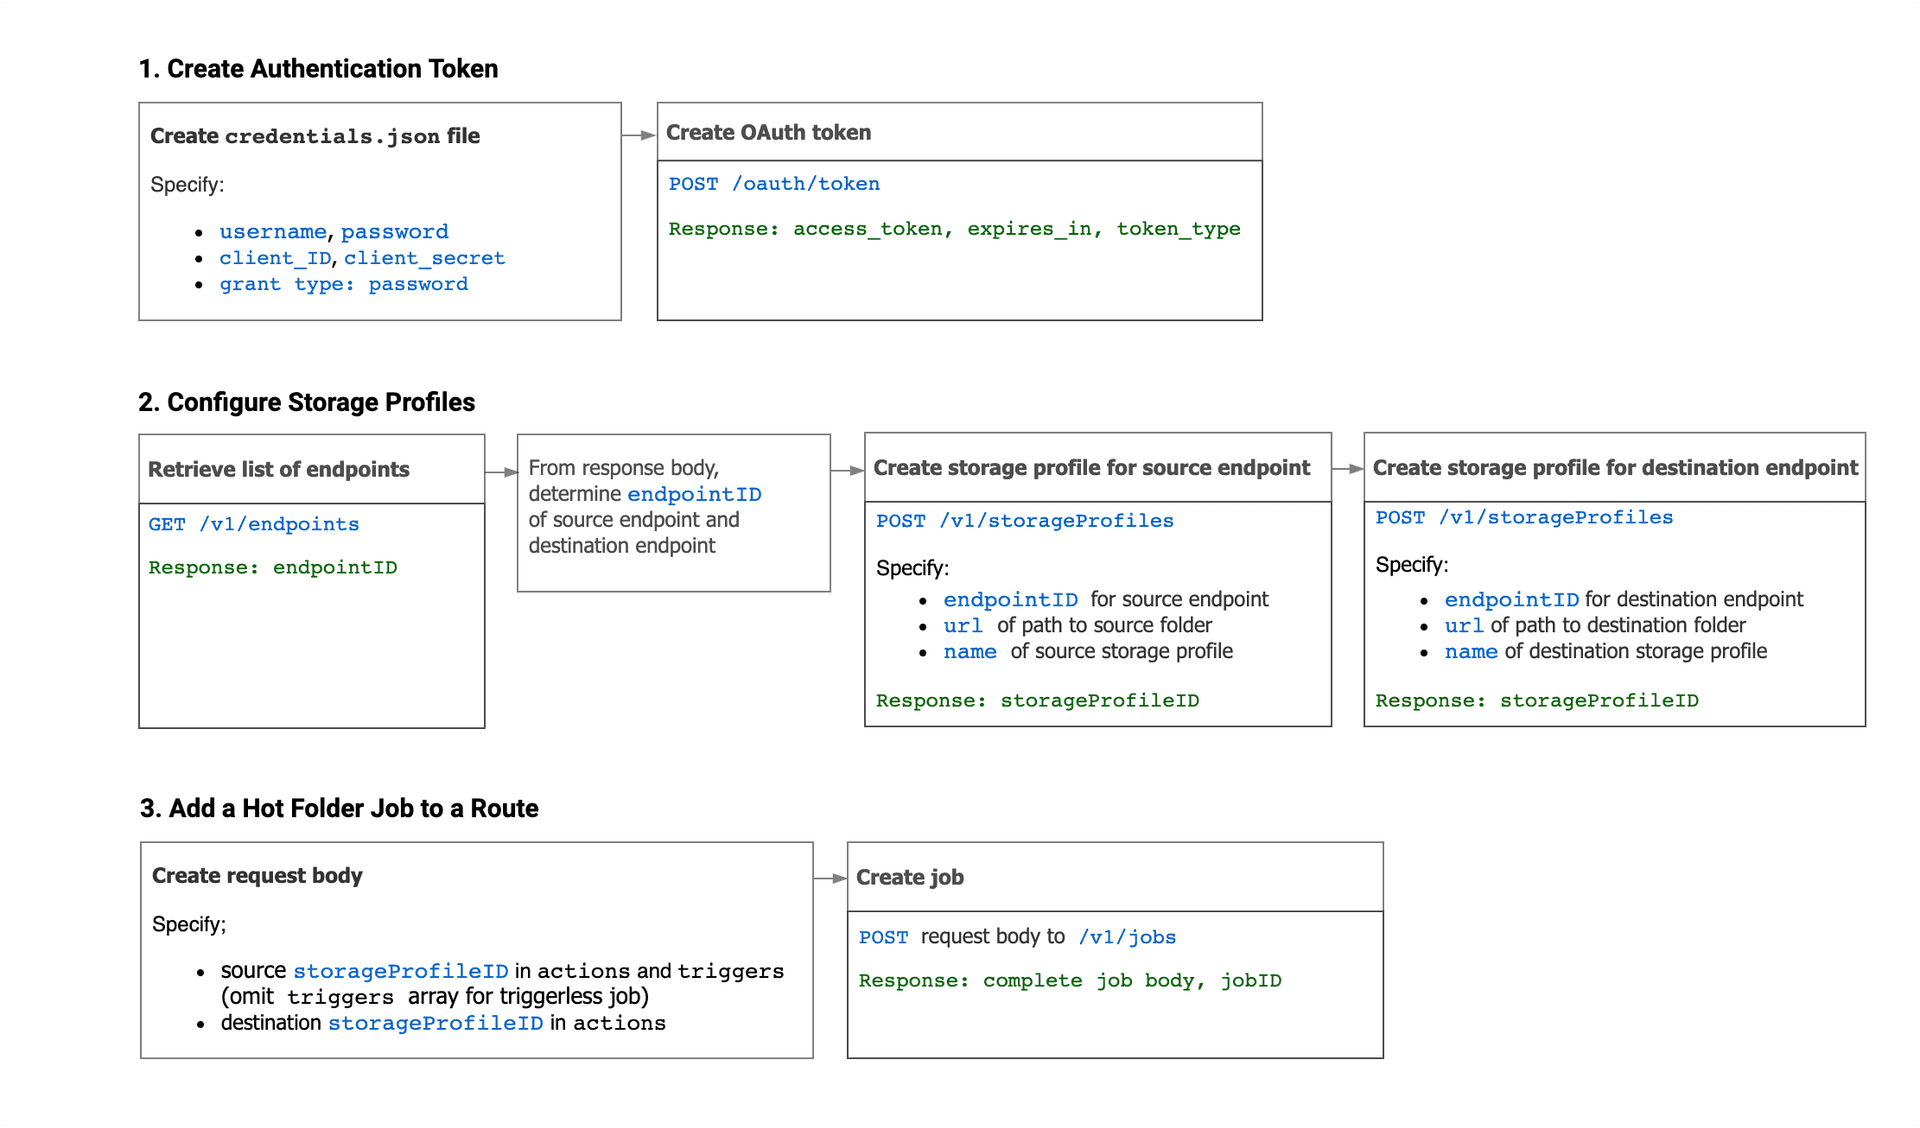
Workflow Example - Adding a Hot Folder Job to a Route
The following image outlines the workflow for adding a hot folder job to a route using the Jet API.