Getting Started with the Manager REST API
Flight Deck provides two APIs that
- A Manager API that allows you to automate jobs, manage users, and control storage settings for transfer environments.
- A Platform API that allows you to monitor job activity, Agent usage, and retrieve Manager backups.
Requests to the Manager API are made to the Manager directly:
https://your.manager.url/signiant/spring/admin/v1.0/
Requests to the Platform API are made to Signiant Cloud Services:
https://platform-api-service.services.cloud.signiant.com
Note: For more information about using the Platform API, see the Platform API documentation.
Accessing the Manager API
The default Administrator account automatically has access to the Manager API. Additional user accounts require access to the administration interface to access the Manager API.
To enable API access for a user:
- In your Manager, navigate to Administration > Users > List.
- Under Roles, select Administration Interface Login.
Note: Enabling the Improve web service API performance with reduced security auditing option reduces the security log level to improve overall API performance.
API Rate Limit
Rate limits are designed to allow Manager to reliably make API requests over time to control transfers and administration.
The Manager uses a token bucket algorithm to allow many jobs to be processed at once without overwhelming the application.
- All Signiant Managers have a bucket size of 500 tokens
- Creating a job via API requires 5 tokens
- All other requests require 1 token
Tokens are replenished to the bucket once the call is completed. If the request limit is exceeded, an HTTP 429 Too Many Requests error is returned, and the call cannot be completed. To avoid repeating unprocessed requests, ensure that your integration has the ability to limit the number of requests to the token bucket limit.
Managing Users
Manager interface users have access to the Manager software, and are assigned permissions that allow or restrict access to parts of the Manager.
The main Administrator user account is created during Manager installation and is granted full access to the Manager API and can create additional users that can access the Manager and associated API.
Creating Users
Using valid login credentials, create a new user using the Manager's /signiant/spring/admin/v1.0/users endpoint. To create a user that will require access to the API, ensure that isAdminGuiLogin is set to true.
To create a new user:
-
Create a new JSON file specifying the new user details, roles, ACLs, and a temporary password:
{ "user": { "userName": "exampleUserName", "fields": { "accessAcls": [ { "edit": true, "execute": true, "read": false, "remove": true, "userName": "exampleUserName" } ], "cell": "1-555-555-1234", "email": "user@example.com", "failedLoginTimePeriod": "24", "fax": "1-555-555-4321", "firstName": "Example", "groups": "exampleGroup", "ignoreAdministrationForSoapAuth": false, "lastName": "User", "maxAllowedLoginAttempts": "10", "menus": [ { "name": "Groups", "parent": { "name": "Jobs" } } ], "organization": "Example Organization", "password": "examplePassword", "phone": "1-555-555-1111", "roles": { "isTemporary": false, "isAdminGuiLogin": true, "validFrom": null, "validTo": null, "isSysAdmin": false, "isOrgAdmin": false, "isWorkflowAdmin": false, "isWorkflowSupervisor": false, "isCompEditor": true, "isMonitorUser": false }, "title": "Dr." } } }Note: To use Directory Service authentication for the Manager interface, leave the
passwordfield as an empty string. -
Save the file as
newUser.json. -
In your terminal or command prompt, navigate to the directory where
newUser.jsonis stored. -
Use the
curlutility to POST to the/signiant/spring/admin/v1.0/usersendpoint, including valid access credentials in the header andnewPortal.jsonas the request body:
curl -X POST https://manager.url/signiant/spring/admin/v1.0/users \
  -H "username:<userName>" \
  -H "password:<password>" \
  --data @newUser.json
The response body contains the user details including the creator, user identifier, and user name.
{
  "creator": "admin",
  "users": [
    {
      "id": "325316",
      "userName": "exampleUserName"
    }
  ]
}
Listing Existing Users
To view a list of all registered users, make a curl request to the /signiant/spring/admin/v1.0/listusers endpoint:
curl -X GET https://manager.url/signiant/spring/admin/v1.0/listusers \
  -H "username:<userName>" \
  -H "password:<password>"
All users are returned in a JSON array.
[
  {
    "user": {
      "id": 12345,
      "userName": "Administrator",
      "state": {
        "status": "Activated",
        "lastLoginAttempt": "2018-01-20T09:03:19",
        "lastSuccessfulLogin": "2018-01-20T09:03:19",
        "lastLoginResult": "Success",
        "guest": false
      },
      "fields": {
        "firstName": "First Name",
        "lastName": "Last Name",
        "organization": "Example Organization",
        "mediaExchange": null
      }
    }
  }
]
Working with Jobs
Setting Job Parameters
Job parameters are string key value pairs contained within the request body and define the overall settings for a job. Job parameters for any valid string syntax, including URLs, local network storage paths, CIFS (Windows shares), Windows drive letters, and NFS.
To view a complete list of available job parameters:
- In your Manager, navigate to Jobs > Templates.
- Select the appropriate job template library and click Open Canvas.
- Right-click on the first component in the appropriate job template and select Show Web Services Info.
Note: Job parameters are case sensitive.
Creating Jobs
Every job is based on a specified job template. Flight Deck includes predefined job templates with the Manager that allow file transfers between supported storage types:
- Media Mover provides job templates used for transfers in file system storage.
- Object Mover provides job templates used for object storage file transfers.
Each job is identified by its name and job group.
Note: Job names must start with a letter and can only contain letters and numbers.
After a job is created via the API, it is visible in the Manager and can be used like any other job.
Note: It is recommended to create a new job when transferring files using the API. Creating a unique job can provide more specific logging in the case a transfer fails.
Configuring Media Mover Jobs
The Media_Mover_Workflows Job Template Library includes three default job templates:
| Job Template | Type | Description of Transfer |
|---|---|---|
| MediaReplicator | Push | One-to-one, one-to-many - optimized for many small files |
| MediaDistributor | Push | One-to-one, one-to-many |
| MediaDropBox | Push | One-to-one, one-to-many |
| MediaAggregator | Pull | One-to-one, many-to-one |
You can also use the API to call any custom templates you have created. To create a job using the API, you must send an API request containing a JSON body that includes the required parameters for the job template.
You can include more than one job in each request within a limited capacity depending on your Manager configuration.
Configuring Object Mover Jobs
Object Mover allows transfers between S3 compatible, Amazon S3, or Microsoft Azure cloud object storage.
Object Mover offers three job templates:
| Job Template | Type | Source | Destination |
|---|---|---|---|
| ObjectUploader | Pull | File System | Object Storage |
| ObjectDownloader | Push | Object Storage | File System |
| ObjectReplicator | Push | Object Storage | Object Storage |
| ObjectDropBox | Push | File System | Object Storage |
Note: An Object Agent can be configured to transfer files using S3 compatible object storage or using Amazon S3 or Microsoft Azure storage, but not both.
You can also use the API to call any custom templates you have created. To create a job using the API, you must send an API request containing a JSON body that includes the required parameters for the job template.
You can include more than one job in each request within a limited capacity depending on your Manager configuration.
Using Object Storage Profiles
Object Mover job parameters require an object storage profile. Object Storage Profiles allow you to use the same set of credentials for object storage across multiple jobs without needing to re-enter credentials.
Note: More information on Object Storage Profiles is available via Signiant Help.
Using an object storage profile when creating a job requires a JSON key/value pair within the SourceData or TargetData properties. Quotes around the storage profile name must be escaped:
...
"jobArgs":{
                    "ObjectUploader.Source.SourceAgent":     "example-s3-storage",
                    "ObjectUploader.Source.SourceData":      "{\"name\":\"Profile Name\"}"

...
If desired, you can specify a custom sub-folder for the job transfer, which also requires escaped quotes:
...
"jobArgs":{
                    "ObjectUploader.Source.SourceAgent":     "example-s3-storage",
                    "ObjectUploader.Source.SourceData":      "{\"name\":\"Profile Name\",\"subfolder\":\"source_folder/\"}"

...
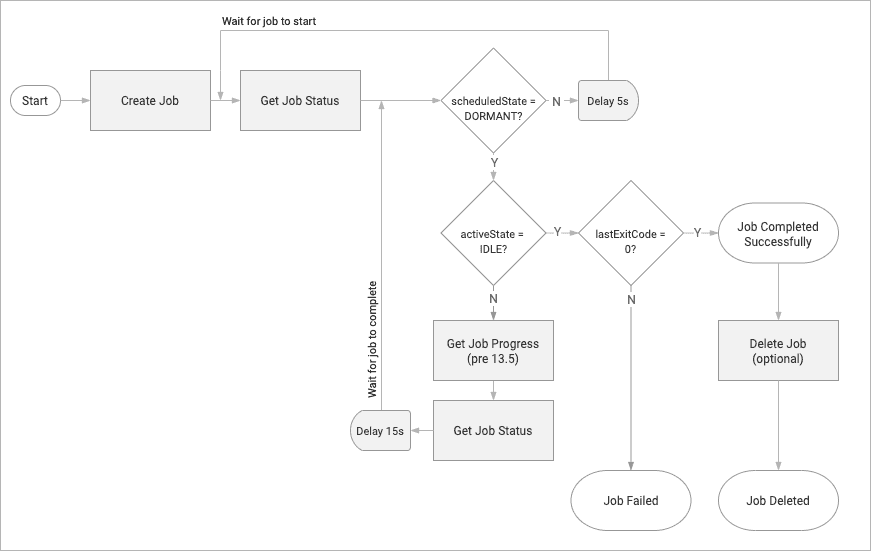
Checking Job Status
The job status is maintained across two fields:
- activeState: What the job is currently doing
- scheduledState: What the job is scheduled to do in the future
For example, a job set to run once showing the activeState as RUNNING, will display scheduledState as DORMANT, as no other runs are scheduled for that job.
Returned statistics show started workflow components. For standard job templates, the first component to run is the file transfer component. This is the only component that has a measurable execution time.
Note: Statistics are processed by the Manager every 15 seconds. The order of the response containing job statistics can vary.
To request job status, make a GET request to /jobs/MyJobName/MyJobGroupName.
Example Response
[
    {
      "job": {
        "id":                        12345678,
        "jobName":                   "MyJobName",
        "fields": {
          "jobGroupName":            "MyJobGroupName",
          "jobTemplateLibraryName":  "Media_Mover_Workflows",
          "jobTemplateName":         "MediaReplicator",
          "activeState":             "IDLE",
          "scheduledState":          "DORMANT",
          "lastExitCode":            0,
          "percentComplete":         "100%",
          "lastActiveStatusMessage": "",
          "activeFilename":          "",
          "jobArgs": {
            ...
          }
        }
      }
   }
]
Sending Job Commands
Once you have created a job, you can send commands through the API to control the job.
Valid job commands are:
force- Start the job immediately.kill- Cancel the running job.suspend- Prevent future scheduled runs of the job, and prevent it from running automatically in the future.resume- Resume a suspended job.delete- Remove the job from the manager.setbwlimits- Set the bandwidth limits for a job.
Setting Bandwidth Limits
The setbwlimits command allows you to set a job-specific resource control that limits certain bandwidth limits:
- Maximum Speed
- Bandwidth Floor
- Bandwidth Ceiling
Example Requests
curl -X GET -k -H "username:<userName>" -H "password:<password>" https://manager.url/signiant/spring/admin/v1.0/jobs/command/<jobname>/<jobGroupId>/setbwlimits_<maximumSpeed>:<bandwidthFloor>:<bandwidthCeiling>To remove a bandwidth limit, pass the command again with a 0 for any limits you want to remove:
curl -X GET -k -H "username:<userName>" -H "password:<password>" https://manager.url/signiant/spring/admin/v1.0/jobs/command/<jobname>/<jobGroupId>/setbwlimits_0:0:0If you do not need to set all three available limits, leave that parameter blank. For example, to exclude the Bandwidth Floor parameter, use the following syntax:
curl -X GET -k -H "username:<userName>" -H "password:<password>" https://manager.url/signiant/spring/admin/v1.0/jobs/command/<jobname>/<jobGroupId>/setbwlimits_MaximumSpeed>::<bandwidthCeiling>Deleting Jobs
Once a job is complete, you have the option to delete it.
There are two options for deleting a job via the API:
-
Soft Delete: Marks the job as deleted in the Manager, but the database records are kept for reporting purposes until they are deleted by a maintenance job.
-
Hard Delete: Immediately deletes the job and all associated database records. This choice prevents database growth that can impact performance.
To soft delete a job, make a DELETE request to /jobs/MyJobName/MyJobGroupName.
To hard delete a job, send a DELETE request jobs containing a request body with the jobGroupName and jobName:
[
  {
    "job": {
      "fields": {
        "jobGroupName": "MyJobGroupName"
      },
      "jobName": "MyJobName"
    }
  }
]
Working With Multiple Agents and Data Sources
The SourceAgents and TargetAgents JSON key accepts more than one Agent per job depending on the job template and user permissions.
For example, a MediaAggregator job that transfers files from two Agents is represented in the job JSON separated by a space:
"MediaAggregator.Source.SourceAgents": "a.windows.agent b.windows.agent a.linux.agent b.linux.agent",Jobs that include using more than one data source use the siglist XML elements to list the files or folders included in a job.
The <siglist> tag accepts a type attribute that is dependent on the source. Transfers from file systems use filedir to locate files using a path to a file or directory. Transfers from object storage use multilineval to locate files by name.
All <el> elements within siglist require the following attributes:
v- The path to the filet- Transfers usingfiledirmust set a data type:d- Directoryf- File
The following example shows XML markup for transfers from a file system:
<siglist type="filedir">
  <el v="c:\path\to\transfer\source" t="d"></el>
  <el v="/path/to/source" t="d"></el>
  <el v="/path/to/file.mp4" t="f"></el>
</siglist>
The following example shows XML markup for transfers from object storage:
<siglist type="multilineval">
  <el v="/sourcefile_1"></el>
  <el v="/sourcefile_2"></el>
</siglist>
When used as a JSON value in an API call, all quotes (") and backslashes (\) must be escaped and included in the relevant key:
[
  {
    "job": {
      "jobName": "MediaAggregatorAPI",
      "fields": {
        "jobGroupName": "MediaAggregator",
       ...
        "jobArgs": {
          ...
          "MediaAggregator.Source.SourceAgents": "a.windows.agent b.linux.agent",
          "MediaAggregator.Source.SourceData": "<siglist type=\"filedir\"><el v=\"c:\\path\\to\\transfer\\source\" t=\"d\"></el><el v=\"/path/to/source\" t=\"d\"></el></siglist>",
          ...
        }
      }
    }
  }
]
Note: Transfer jobs automatically detect which Agent to use as a source for a file or directory by determining whether the path can be accessed on the job's related Agents. If the same path exists on more than one Agent included in the API call, data from all relevant Agents will transfer in the job.
Configuring API Integration For Agent Groups
To improve efficiency when transferring files directly to or from specific Agents, you can configure Agent groups. Agent groups allow you to define a set of Agents with a specific group name. Agents can also be swapped in and out of an Agent group without needing to reconfigure your integration. Agent groups can be flagged as load-balanced, to provide redundancy and scalability when a job runs between Agents in the group.
For more information, see Configuring Agent Groups.
Agent groups are always associated with a specific organization. When configuring a transfer to run to or from a given Agent group, the organization's API Identifier must be included in the request body.
You can find an organization's API Identifier on the Administration > Manager > Organizations menu.
To use an organization's Agent group, use the format <AgentGroupName>!<OrgId>, eg. agentGroupName!4321
Transferring Data From An Agent Group
Example Request Body
[
  {
    "job": {
      "jobName": "MyJobName",
      "fields": {
        "jobGroupName": "MyJobGroupName",
        "jobTemplateLibraryName": "Media_Mover_Workflows",
        "jobTemplateName": "MediaReplicator",
        "jobArgs": {
          "MediaReplicator.Source.SourceAgent": "agentGroupName!4321",
          "MediaReplicator.Source.SourceData": "c:/source/-directory",
          "MediaReplicator.Target.TargetAgents": "target-agent-url",
          "MediaReplicator.Target.TargetDirectory": "c:/target-directory",
          "MediaReplicator.Schedule._sp_frequency": "once"
        }
      }
    }
  }
]
Troubleshooting Job Failures
When a job fails, troubleshooting details are available in the Manager's job logs.
To view a job log:
- In your Manager, navigate to Jobs > Groups.
- Select the Job Group and click View Jobs.
- Select the failed job and click Details.
- Under Job Logs, select Job Log and View. Log entries can be sorted according to the severity of error.
A REST API endpoint is available to retrieve the job log programmatically for display in the third-party application.
Implementing Custom Workflows
You can create custom workflows to fit your business requirements. Exporting and importing workflows via the Manager or the SOAP API allows you to distribute a custom workflow across different Manager installations.
Custom workflow component integration is generally managed at the API level where the files within the workflow are directed to a MAM, DAM, or other application. The Signiant job monitors the progress and status of the third-party processing, and reports results to the Manager.
The default components included with every Agent installation are written in Perl, but workflow components can be written in Ruby, Node.js, or other languages.
Manager API Architecture Diagram